Introduction
This part will be about the problem itself. If you’re someone who doesn’t enjoy the suspense caused by a cliffhanger at the end of a series episode, you might want to wait for the upcoming next part, where the evil problem will receive its well-deserved solution. The previous part can be found here: Data-Driven Testing 1.
The Evil Problem
We have a Python program – a fairly simple little command-line tool. Its task is to determine, based on three length values given as arguments, whether those values can form the sides of a triangle. The program’s output is either “triangle” or “not triangle”.
Let me apologize here to those who don’t enjoy math — I promise to be gentle. I’ll keep things simple and will spare you from the mercilessly technical language of mathematics.
So, three lengths can form a triangle if the sum of any two is greater than the third. That’s simple, yet it’s still not guaranteed that the programmer implemented the logic flawlessly.
(Spoiler: the program is buggy! 🙂 )
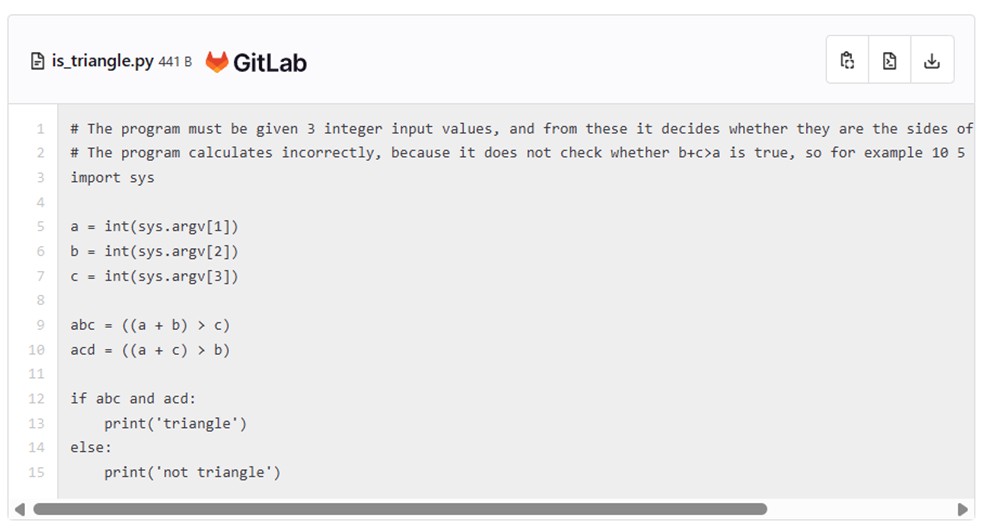
Here’s how you can try it from the command line:

The result of this will be “triangle”, because:
3 + 4 > 5,
3 + 5 > 4, and
4 + 5 > 3 are all true.
In this case, the program works correctly.
First Attempt with Robot Framework
To be able to run the is_triangle.py program from the command line, we’ll need the Process library:

If we take a look at the possibilities provided by the Process library, we’ll quickly find the solution (triangle_test.robot):
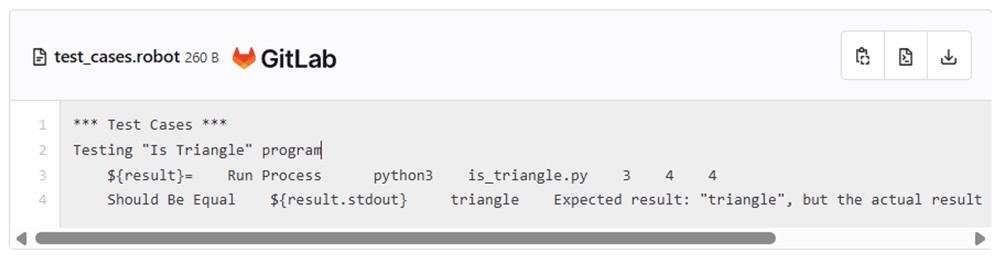
The is_triangle.py program must be placed next to the triangle_test.robot file, and the test can then be executed. Here’s how the test works:
The “Run Process” keyword runs the desired command-line instruction with the given parameters and writes the result into the ${result} variable.
The “Should Be Equal” keyword compares the output text (${result.stdout}) with the expected result, which is: "triangle".
If the two compared values
match, the final result of the test is “PASS”.
If they do not match, it will display:
“Expected result: ‘triangle’, but the actual result not triangle.”
The False parameter at the end is necessary because we want to display our own custom error message.
Refinement
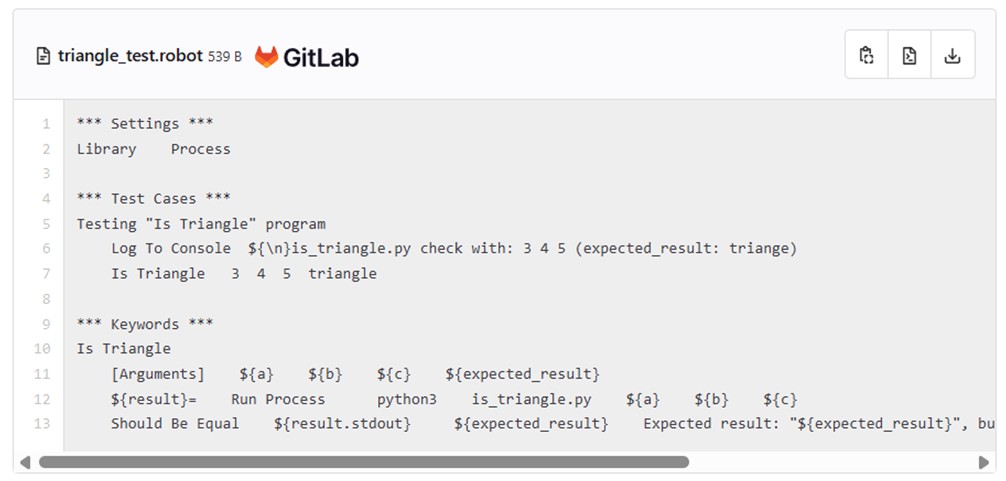
The previous solution was very rudimentary, and the test case is practically “unreadable”, so we’ll make some basic adjustments to ensure everyone is satisfied with our work.
- We’ll move the “ugly part” into a keyword,
- Handle the side lengths and the expected result as parameters.
Why isn’t this good enough for us?
With this method, the full code looks like this:
This is a good solution, but it won’t be our best option. If we want to run the test with new test data as well, we would have to duplicate the same test case multiple times. And we do want to test with different data because we are good testers.
Test Cases
With a little equivalence partitioning, the following cases come to mind quickly. (I hope you can think of even more! 🙂 )
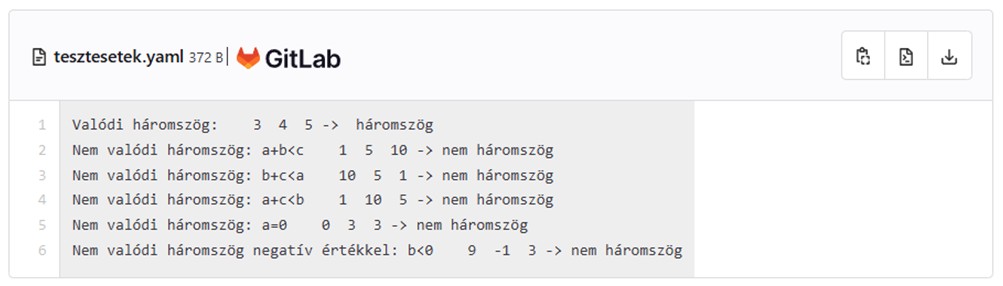
Okay, these are just 6 cases in total. With so few possibilities, we might think it’s not too much trouble to write the 6 cases separately. But this is just an example. For activating the 2,000 users mentioned in the previous article, writing 2,000 test cases definitely wouldn’t be a good solution.
Cliffhanger
Data-driven testing is precisely the lifesaver in such situations.
In the next part, we will learn how the hero, data-driven testing, defeated the evil problem using Robot Framework.
Until then: Happy testing!
Good luck!