Introduction
For those who have been patient, here is the well-deserved Robot Framework solution to the problems raised in the previous articles. The previous part can be found here: Data-DrivenTesting 2.
Recap
In the previous part, we started testing a simple Python program. The program’s task is to decide, based on three length values given as arguments, whether they can be the sides of a triangle. We wrote a test case for this in the previous part and designed a few more by varying the test data.
We also realized that “it would be nice if it could look better.” This is where we are now, and this is where we continue.
Robot Framework and Data-Driven Testing
Historical Perspective
When I originally learned data-driven testing, most tools didn’t have this capability built-in; you had to convince them to do what you wanted. This basically meant writing a few well-directed FOR loops. In Robot Framework, this was the solution for a long time. It is still applicable today, but it has one major drawback besides being cumbersome and ugly: tests defined by test data are treated as a single test case. If one fails, then all tests are marked as FAILED. Then you have to investigate the logs to figure out which test data actually caused the problem.
Fortunately, there is now a very useful library that relieves us of the burden of writing FOR loops.
Note: Robot Framework has a built-in option for writing data-driven tests, but it cannot read test data from external data sources. So, skipping that step, we’ll directly look at using the external library.
Installing the Data Driver Library
Before we start, we need to install a library that can handle data-driven testing. The installation is somewhat “branching,” depending on which version of Python you have or whether you want to handle Excel files. Here is the full description: https://github.com/Snooz82/robotframework-datadriver
We will assume we have Python 3.6 or higher and want to handle Excel files:
Trick question: It’s not really a library
DataDriver does not behave like a regular, proper library. Its keyword set is so minimal that it basically doesn’t have one. 🙂 DataDriver manipulates the normal Robot Framework operation by generating new test cases based on a data file that contains the data needed for data-driven testing. The data files can be .csv, .xls, or .xlsx files.
How to use it? (Theory)
If you use the DataDriver library, the steps you want to execute as test cases must be put precisely into one keyword, where each test data corresponds to a parameter.
You have to prepare the file that contains the test data.
In the Settings section, you need to specify two things:
- Where the robot can find the test data. This essentially means specifying the csv or Excel file storing your test data.
- Which keyword you want to use for the test cases (the one created in step 1).
In the Test Cases section, you provide a sample test case.
How to use it? (Practical)
We will test the (faulty) Python program used in the previous part (Data-Driven Testing 2). It looks like this:
- Keyword:
The good news is that the keyword we created in the previous part will work perfectly for us; no modifications are needed. So do everything as in the “normal” case. - Test data file
This isn’t too difficult either. 🙂
Whether you choose the CSV or Excel solution, the first row is the header row. This row contains the following elements in order:
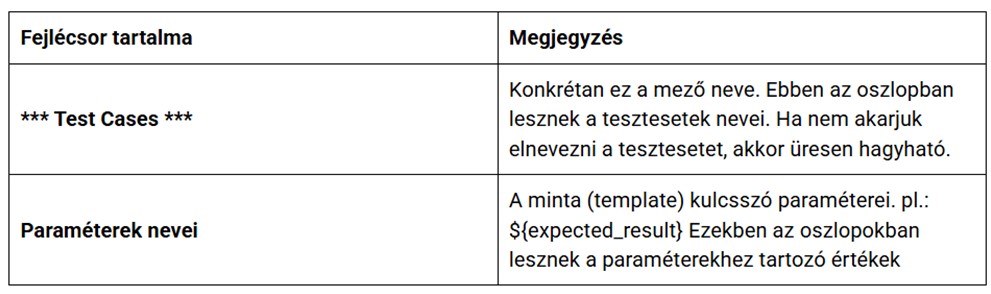
A sample table (We’ve only formatted it here for readability, but in Excel you don’t need to format anything):
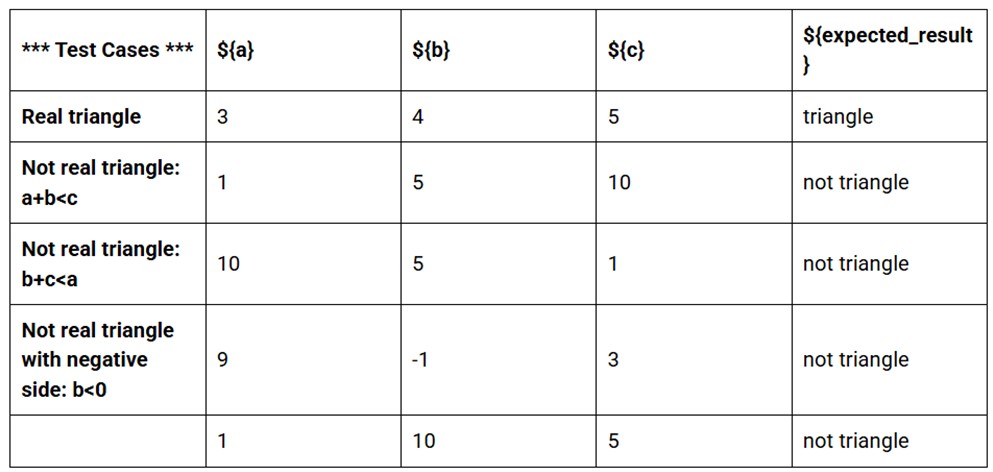
Note: In the case of Excel, give a name to the worksheet! (For example: ddt_data)
- Settings section
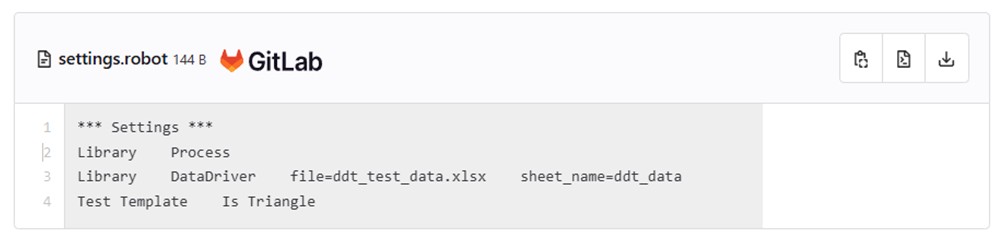
In our case, the Settings section will look like this:
Explanations:
Library Process
The Process library is required for running commands in the command line. With its help, we can run the Python program. (This was already mentioned in the previous part.)
Library DataDriver file=ddt_testdata.xlsx sheet_name=ddt_data
The DataDriver library. The file parameter specifies the test data file. In the case of Excel, we also need to specify the worksheet name with the sheet_name parameter.
Test Template Is Triangle
Definition of the test template keyword.
- Test cases section
Here it is important that only the test case name appears; the test case has no “test body” or steps. The test case name shown in the report and log depends on what is in the test data
- If a test case record does not contain a test case name, then the name given here will appear in the report and execution log for that test run.
- If a test case record does contain a test case name, then the name given in that record will appear in the report and execution log.
- You can “embed” parameter values into the test case name. This is a good option if you do not want to specify test case names in the test data but still want the report to clearly show which data was used in the run.
Example:

Summary
Let’s see the entire code together:

You can find the Robot Framework and Excel files here as well: https://gitlab.com/passed_sharing/robot_framework/-/tree/main/Adatvezerles
Victory!
Nice, it works, and each test record appears as a separate test case in the report and the log. Are there any errors? J
Data-driven testing is a very powerful tool for test automation. Can it be even more effective? Yes! For example, with these:
Data combinations
The DataDriver library can cooperate with the results of Microsoft PICT. (You can read about the PICT “data variation” tool here.)
Automated test data generation
It is possible to create certain test data in a controlled but random way. This topic deserves another article. Coming soon… 🙂
Happy testing! Go for it!